Protocol for High Molecular Weight DNA (HMW DNA) Extraction from Yeast (NEB #T3060)
Below is a detailed protocol for the extraction of high molecular weight DNA from yeast samples. This protocol has been validated for S. cerevisiae; other yeast strains may require some optimization.
Materials Required but Not Supplied:
- Zymolyase; or other yeast lytic enzyme for generating spheroplasts. This protocol was developed using Zymolyase from Zymo Research, #E1005.
- Spheroplast Buffer: 1M sorbitol, 1X PBS pH 7.4, 0.1 M EDTA; or similar buffer to provide osmotic support in cell wall digestion step
- Cold PBS
- Cold 0.5 M NaCl
- Ethanol (≥ 95%)
- Isopropanol
- Thermal mixer containing a 1.5 ml tube block (optional: 2 ml tube block for elution)
- 1.5 ml DNase-free, low DNA binding microfuge tubes (e.g., Eppendorf® DNA LoBind®, #0030108051) for elution and storage (1 per sample); it is especially important to use low DNA binding tubes if working with UHMW DNA
- Recommended: vertical rotating mixer (e.g., Thermo Scientific® HulaMixer® Sample Mixer)
- Wide-bore pipette tips (e.g., Aerosol Filter Wide Orifice Pipette Tips, VWR)
- Microcentrifuge
Important Notes Before You Begin:
- Store Proteinase K and RNase A at -20°C upon opening
- Review the complete protocol before beginning
- Add ethanol (≥ 95%) to the gDNA Wash Buffer as indicated on the bottle label
- Preheat thermal mixer with 1.5 ml block to 30°C (if available, preheat another to 56°C)
Starting Material Notes:
The following protocol has been used to isolate 3-6 μg HMW DNA from 20 x 107 (~20 OD) log-phase, S. cerevisiae haploid and diploid cells. While this workflow includes an RNase A digestion step, RNA is co-purified with HMW DNA to yield 4-10 µg and 6-12 µg total nucleic acids from haploid and diploid cells, respectively. Purity ratios for S. cerevisiae samples are typically 1.9 (A260/A280), reflecting residual RNA present in the sample; and 1.8-2.5 (A260/A230) with systems that differentiate turbidity in the content profiling giving a higher value. For downstream applications that require removal of residual RNA, the RNase A digestion step will require further optimization (Part 2, Step 4). Specifically, users may find that the amount of RNA co-purified may be reduced by 1) extending the RNase A digestion time from 10 min to 30-60 min, and/or 2) using a larger volume of RNase A in the digestion step (e.g., 20 μl instead of 10 μl).
HMW gDNA Purification Consists of Three Stages:
PART 1: Spheroplast Preparation
PART 3: HMW gDNA Binding and Elution
PART 1: SPHEROPLAST PREPARATION
- Harvest ~20 OD log-phase yeast cells by centrifugation at 5000 x g at 16°C for 15 minutes. Remove as much of the culture medium as possible.
- Wash cells by resuspending the cell pellet in 10 ml cold PBS. Centrifuge at 5000 x g at 16°C for 15 minutes. Remove supernatant. Thorough washing of cells to remove all residual culture media is important for subsequent steps, including successful DNA binding to capture beads.
- Repeat step 2.
- Resuspend cell pellet in 500 μl of an appropriate buffer (cold) for spheroplast preparation (i.e., a buffer that provides osmotic support). The Spheroplast Buffer described above in Materials Required but Not Supplied, along with Zymolyase, may be used to prepare S. cerevisiae spheroplasts.
- Add yeast cell wall lytic enzyme [e.g., 10 μl Zymolyase (5U/μl)] and pipette with a wide-bore tip to mix.
- Incubate at 30°C for ~20 minutes. Invert and gently flick tubes every 5 minutes to keep cells suspended in solution. If possible, periodically check 3-5 μl aliquots of the digestion mixture for spheroplast formation under the microscope. Proceed to the next step once ~80% of the cells are spheroplasts.
- If working with a single thermal mixer, increase the temperature to 56°C. Following the sample incubation at 30°C, increase the temperature of the block in the thermal mixer to 56°C.
- Gently pellet spheroplasts by centrifugation for 3 minutes at 300 x g, then remove the supernatant.
- Using a 1000 µl wide-bore pipette tip, gently resuspend the spheroplast pellet in 150 µl of cold 0.5 M NaCl.
PART 2: YEAST CELL LYSIS
- Prepare a master mix of 450 µl HMW gDNA Tissue Lysis Buffer and 15 µl Proteinase K per sample.
- Add 450 µl of lysis buffer master mix (Tissue Lysis Buffer + Proteinase K) to the sample and pipette thoroughly to mix using a wide-bore 1000 µl pipette tip. If processing multiple samples, place each sample in the thermal mixer immediately after mixing with lysis buffer master mix.
- Incubate at 56°C for 30 minutes in thermal mixer with agitation at 2000 rpm. The lysate should become mostly clear as the incubation proceeds.
- Add 10 µl RNase A and mix by inverting 5-10 times. Incubate for 10 min at 56°C in a thermal mixer with agitation at 2000 rpm. For yeast samples, the amount of RNase A added, and incubation time may require additional optimization to reduce RNA contamination in purified HMW DNA.
- Centrifuge for 3 minutes at 16,000 x g to pellet cellular debris. Using a 1000 μl wide-bore pipette tip, transfer the supernatant to a new 1.5 ml microfuge tube.
- Add 0.5 volume (~300 μl) of Protein Separation Solution and mix by inverting for 1 minute.
- Centrifuge for 10 minutes at 16,000 x g. If working with multiple samples, during centrifugation, prepare the plastics for Part 3, as indicated in the following step. The sample will separate into a large, clear upper phase (DNA) and a lower, clear phase (protein, usually on the bottom of the tube). A small amount of residual cellular debris may also be visible at the bottom of the tube.
- If working with multiple samples, prepare and label the plastics for the upcoming steps. Each sample will require:
- 1 Monarch Collection Tube II (no need to label)
- 1 Monarch Bead Retainer inserted into the collection tube; this will be used to remove the wash buffer from the gDNA bound to the beads.
- 1 Monarch Bead Retainer inserted into the collection tube; this will be used to remove the wash buffer from the gDNA bound to the beads.
- 2 Monarch 2 ml Tubes; one for phase separation and one for elution.
- 1 1.5 ml microfuge tube (DNA low bind recommended, not provided); this will be used to collect the eluate.
- 1 1.5 ml microfuge tube (DNA low bind recommended, not provided); this will be used to collect the eluate.
- 1 Monarch Collection Tube II (no need to label)
- Using a 1000 µl wide-bore pipette tip, transfer the upper phase containing the DNA (large, clear phase) to a labeled Monarch 2 ml Tube. Use a 200 µl wide-bore pipette tip to transfer any remaining volume of upper phase. Avoid transferring material from the protein layer at the bottom of the tube, or visible protein material that may be floating in the upper phase. Typically, the transferred volume will be ~ 800 µl.
PART 3: HMW gDNA Binding and Elution
- Using clean forceps, add 2 DNA Capture Beads to each sample, which should be contained in a Monarch 2 ml Tube.
- Add 0.7 volume isopropanol, close the cap, and mix on a vertical rotating mixer at 10 rpm for 5 minutes to attach DNA to the beads. If a vertical rotating mixer is not available, invert slowly and gently by hand 25–30 times. A manual inversion is complete when the tube returns to the upright position. Slow inversion is critical for the DNA to bind to the beads; each full inversion should take ~5–6 seconds. If necessary, flick the tube to release any beads that stick to the bottom of the tube.
After a 2–3 inversions, the solution becomes more viscous and the DNA will wrap loosely around the beads. During the following inversions, precipitation of gDNA may be visible, especially with larger input samples. The DNA complex will often contain small air bubbles. With increasing number of inversions, the DNA will completely wrap around the beads, often causing the beads to stick together. DNA binding to the beads should be complete after 25–30 inversions, and the solution should no longer be viscous. Additional inversions may be necessary for larger input samples.
- Remove and discard liquid by pipetting. Avoid removing any of the gDNA wrapped around the glass beads. For optimal DNA solubility, avoid letting the bound DNA dry out on the beads during this and the following steps; add the next buffer quickly. There are two suggested options for carrying out this step:
- Keeping tube upright, insert pipette tip and gently push beads aside to remove liquid.
- Angle the tube so that beads remain at the bottom, and liquid reaches toward tube opening. Pipette from the liquid surface and continue to angle as liquid is removed (tube will be almost horizontal at the end).
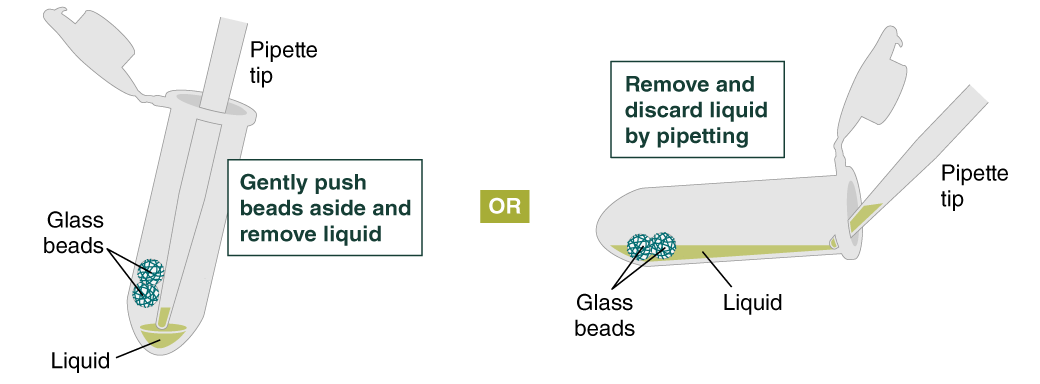
- Keeping tube upright, insert pipette tip and gently push beads aside to remove liquid.
- Add 500 µl gDNA Wash Buffer, close the cap, and mix by inverting the tube 2–3 times. Remove the gDNA Wash Buffer as described in step 3. The loose gDNA complex will condense around the beads more tightly.
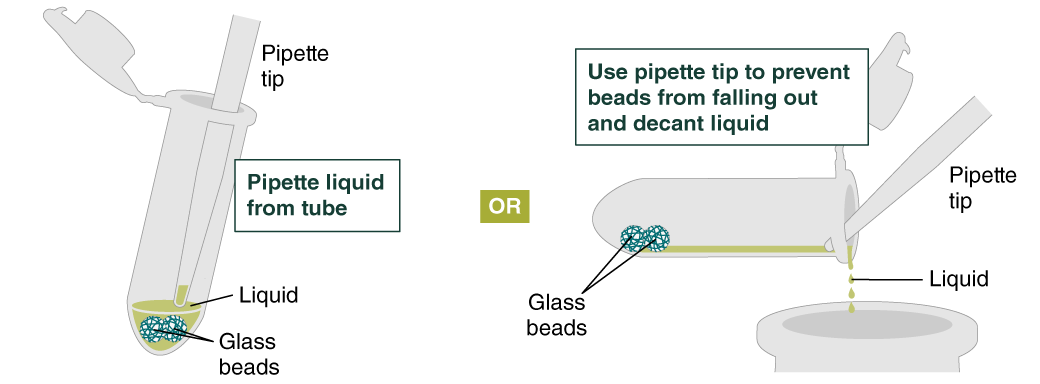
- Repeat the wash in Step 4 and remove the gDNA Wash Buffer by pipetting. Alternatively, the buffer can be removed by decanting: position a pipette tip at the top of the angled tube to prevent the beads from falling out. It is not necessary to remove all the gDNA Wash Buffer at this point.
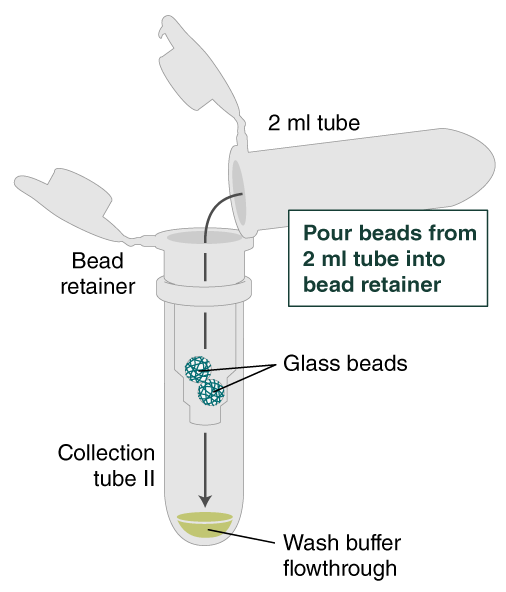
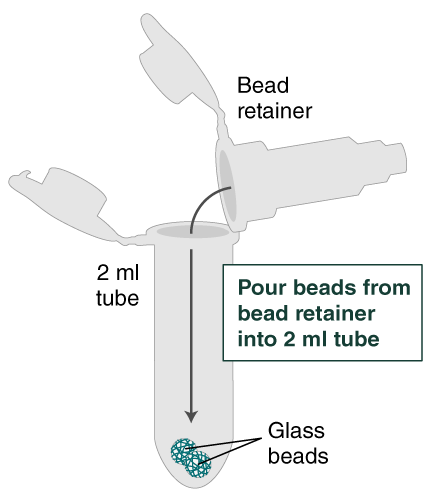
- Place a labeled bead retainer into a Monarch Collection Tube II. Pour the beads into the bead retainer and close the cap. Discard the used Monarch 2 ml Tube. When working with multiple samples, be sure to close the cap of the bead retainer after each transfer of beads.
- Pulse spin (≤ 1 second) the sample in a benchtop minicentrifuge to remove any residual wash buffer from the beads.
- Separate the bead retainer from the collection tube, pour the beads into a new, labeled Monarch 2 ml Tube, and insert the used bead retainer into the labeled 1.5 ml microfuge tube (DNA low bind recommended, not provided) for later use during elution. Discard the used collection tube.
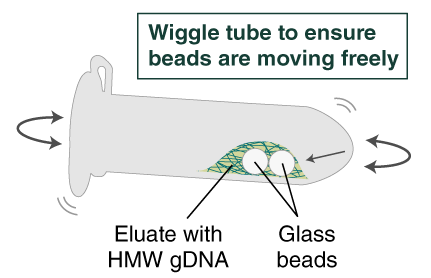
- Immediately add 100 µl Elution Buffer II onto the glass beads and incubate for a minimum of 5 minutes at 56°C in a thermal mixer with agitation at the lowest speed (300 rpm). Halfway through the incubation, ensure the beads are not stuck to the bottom of the tube by tilting the tube almost horizontally and gently shaking. This ensures that the beads can move freely, allowing for optimal release of the DNA from the beads. It also ensures that the lower bead does not stick to the bottom of the tube during the following transfer step. Elution volume can be reduced to as low as 50 μl without affecting recovery. However, if using < 100 μl, the gentle shaking of the sample should be done several times during the incubation to ensure complete wetting of the beads.
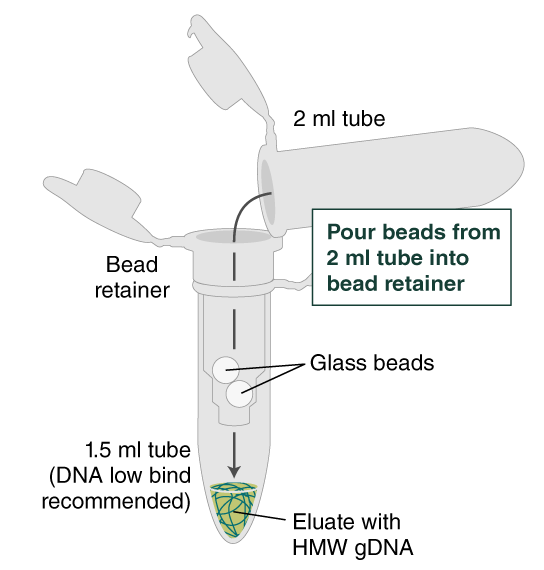
- Ensure the bead retainer is inserted into the 1.5 ml microfuge tube. Pour the eluate and the glass beads into the bead retainer and close the cap. When working with more than 1 sample, it is important to close the cap after each transfer of beads. Typically, all the eluate flows into the bead retainer upon pouring. If any volume remains in the 2 ml tube, spin briefly and transfer.
- Centrifuge for 30 seconds at 12,000 x g to separate the eluate from the glass beads. Discard the beads and retainer.
- Pipette eluate up and down 5–10 times with a wide bore pipette tip and ensure any visible DNA aggregates are dispersed. Before analysis or downstream use, HMW DNA must be homogeneously dissolved. After pipetting, incubate at 37°C for 30-60 minutes, overnight at room temperature, or for > 24 hours at 4°C. Pipette up and down 5-10 times again before analyzing or using the HMW DNA. Samples processed using low agitation speeds during lysis will require additional time to fully dissolve. See additional guidance in “Homogenization of HMW DNA Samples”. Samples can be stored at 4°C for short term use (weeks), or at -20°C for long term storage. The elution buffer (10 mM Tris, pH 9.0, 0.5 mM EDTA) is formulated for long term storage of gDNA.